This article may contain affiliate links. If you purchase through a link, I may earn a small commission at no extra cost to you. Read my full Affiliate Disclosure.
For a long time, I thought the reason my apartment felt like a sad little cave had everything to do with square footage. It was small – genuinely small, the kind of small space where you can stir a pot on the stove and scroll through Netflix at the same time – and I figured there was only so much you could do with that.
Then a friend came over, looked around for about thirty seconds, and said: “Your lighting is killing this room.”
She wasn’t wrong. I had one overhead fixture in the middle of the ceiling – a builder-grade globe light that flooded the room in a flat, clinical brightness that made everything feel exactly as cramped as it was. I’d been blaming the square footage when the real problem was the light hitting the space from a single source, casting shadows into every corner, making the walls feel closer than they actually were.
That was the moment I started taking small space lighting seriously. And honestly? It changed every room I’ve decorated since. This guide covers everything I know now – including the mistakes I made that I’m still a little embarrassed about.
Table of Contents :
Your Quick-Start Plan for Small Space Lighting
Before we go deep, here’s the roadmap. Come back to this if you get overwhelmed.
- Phase 1: Audit What You Have – Walk through your space at night and note every light source. Single overhead fixture doing all the work? That’s the problem right there.
- Phase 2: Identify Your Dark Corners – Every room has spots where light dies. Corners, under shelving, along low walls. Mark them – those are where you’re going to add sources.
- Phase 3: Choose Your Warmth – Before buying anything, decide on a Kelvin temperature (more on this below). Mixing warm and cool bulbs in the same room looks chaotic.
- Phase 4: Layer Your Sources – Aim for at least three distinct light sources at different heights. This is the whole game. Seriously.
- Phase 5: Push Light Up and Out – Uplighting and wall washing make ceilings feel taller and walls feel farther apart. It sounds like magic. It kind of is.
- Phase 6: Add a Dimmer – A single dimmer switch transforms what a room can do across a whole day. Worth every penny.
The Small Space Lighting Mistake Almost Everyone Makes
Here it is: people treat lighting like it’s purely functional. Flip it on when it’s dark, flip it off when you leave. Done.
I did this for years. And the result was always the same – a room that felt fine during the day and sort of depressing after sunset. Not dramatically bad. Just… flat. Uninviting. Like a waiting room that happened to have my couch in it.
The reason it’s such a common mistake makes total sense. Most of us grew up in homes where overhead lighting was the default – one fixture per room, period. We didn’t learn that light has direction, that it has warmth, that it can make a ceiling feel higher or a corner feel cozy or a room feel twice its actual size. Nobody teaches you that in a way that sticks.
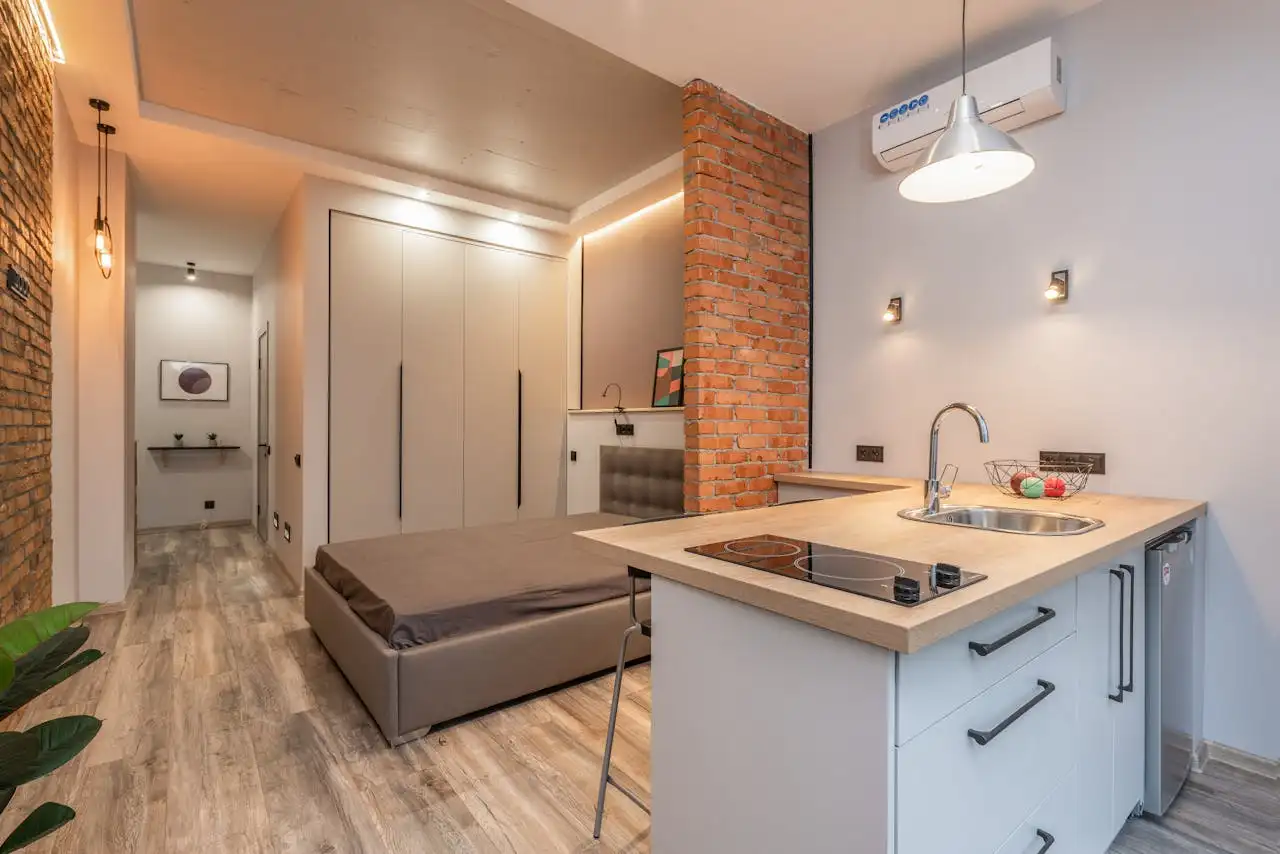
What professional lighting designers call layered lighting is the correction to this. It means never relying on a single source. It means thinking about light the way you’d think about furniture – what goes where, at what height, doing what job. In a small space especially, that layering is the difference between a room that feels cramped and one that feels intentional.
The common approach – one bright ceiling fixture – does two things wrong at once. It creates harsh shadows directly below objects, making clutter and crowding more visually obvious. And it draws the eye down, which is exactly what you don’t want in a low-ceilinged or tight space. More on how to fix both of those in a minute.
How to Light a Small Space: What Actually Works
Understanding the Three Layers (And Why Each One Does Something Different)
Lighting designers break light into three types, and once you understand what each one actually does to a space, you can’t un-see it anywhere you go.
Ambient lighting is your general illumination – the overhead stuff, recessed lights, flush mounts. It gives a room its baseline brightness. In a small space, this is usually what people have too much of, pointed from the worst possible angle.
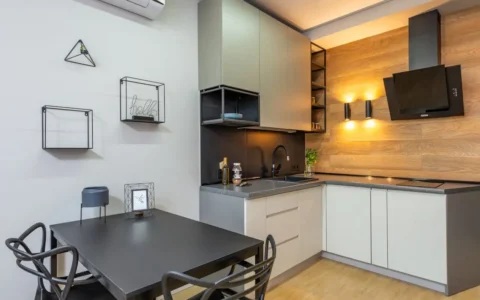
Task lighting is focused and purposeful – a reading lamp, under-cabinet kitchen lights, a desk lamp. It handles specific activities without flooding the whole room in bright light. In small spaces, good task lighting means you can turn off the harsh overhead ambient light entirely in the evening, which immediately makes the room feel warmer and less clinical.
Accent lighting is the layer most beginners skip entirely – and it’s arguably the most powerful one for making a small space feel bigger. This is light that highlights something: a plant, a shelf of books, a piece of art, an architectural detail. It creates visual depth. When your eye has something to travel to across the room, the room feels larger. That’s not a trick or an illusion – it’s just how human perception works.
The practical takeaway: if your small space has only ambient lighting right now, your first move isn’t to replace it. It’s to add one task source and one accent source. Start there.
Color Temperature Changes Everything – And Most People Get It Completely Wrong
I got this wrong for an embarrassing number of years. I bought bulbs based on the wattage equivalency on the box and wondered why my rooms always felt either too harsh or too dim. The actual variable that matters is Kelvin temperature – and nobody explains it properly on the packaging.
Here’s how to think about it: bulbs in the 2700-3000K range emit a warm, amber-leaning white. They’re what you want in bedrooms, living rooms, dining areas – anywhere you want the space to feel cozy and human-sized. Bulbs in the 3500-4100K range are a cooler, crisper white – better suited to kitchens and home offices where you need clarity over comfort. And bulbs at 5000-6500K are essentially mimicking daylight – very bright, slightly blue-white, great for task work but genuinely unpleasant in a living space at night.
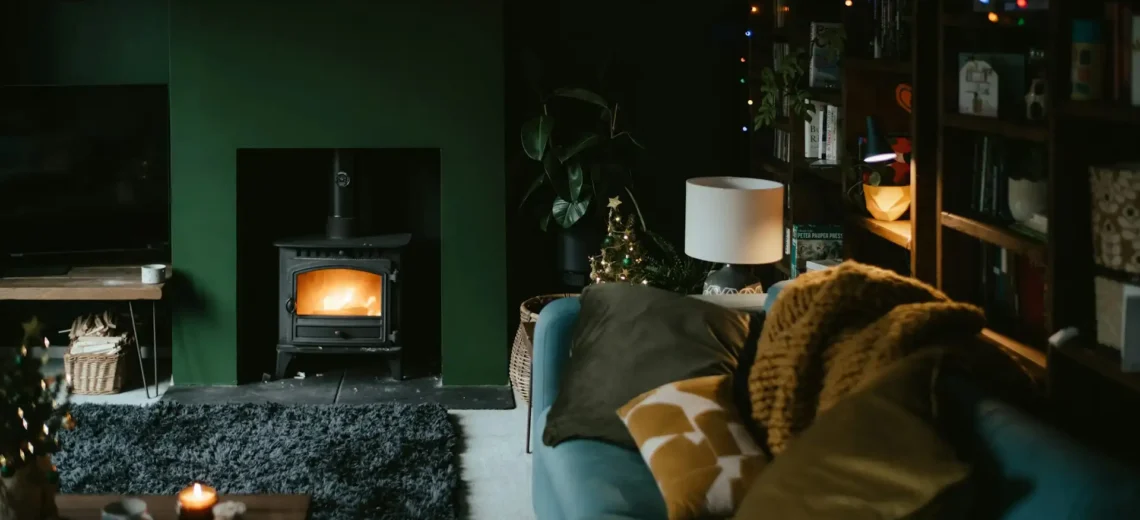
In a small space, warm-toned bulbs (2700-3000K) do something specific: they soften the edges of the room. Shadows become less harsh. The transition between lit and unlit areas feels more gradual. The room starts to feel like it has atmosphere rather than just ceiling brightness.
One more thing: mixing color temperatures within the same room looks messy in a way that’s hard to diagnose. If your lamp has a 2700K bulb and your overhead is 4000K, the room will feel slightly off and you won’t know why. Commit to one temperature throughout a space. Your eye will thank you.
Making Walls Feel Farther Apart With Light Direction
The first time I got the layering really right – all three sources working together, warm temperature throughout, light washing up a wall instead of just blaring down from the ceiling – I stood in the doorway of my own apartment and actually stopped for a second. I’m not being dramatic when I say it felt like a completely different room. Not a bigger room, exactly. But a room with breathing space. That sensation of a wall being farther away than it technically is.
Here’s the mechanism behind that feeling: when light comes from above only, it creates a bright horizontal plane (your floor and surfaces) and dark vertical planes (your walls). Your eye registers walls as closer because they’re visually compressed into shadow. When you push light upward and outward – with uplighting, with sconces, with lamps placed near walls rather than in the center of the room – you illuminate those vertical planes and the room opens up.
This is what designers mean when they talk about wall washing: getting light to graze or flood a wall surface, which extends the eye’s travel path and creates the perception of more space. A floor lamp with an upward-facing shade tucked into a corner will do this. A simple uplighter (a frosted glass cylinder pointing up) costs well under $50 at most home stores and transforms a dark corner into a glowing focal point. Even a table lamp placed near a wall – rather than marooned in the middle of a console – bounces light off that surface and makes the wall feel part of the room rather than a boundary.
For small bedroom lighting, this means placing lamps on nightstands rather than relying on an overhead fixture. For a small living room, it means floor lamps in corners and table lamps at seated eye level. For kitchen lighting in a small space, it means under-cabinet task lighting that illuminates the counter surface instead of just the overhead glare from above. The principle is always the same: diversify the direction light is coming from, and prioritize the walls.
Fixtures, Dimmers, and the Budget Reality
Let me be honest about what this actually costs, because I’ve seen a lot of small space lighting content that glosses over the numbers.
A good floor lamp runs anywhere from $60 to $250+ depending on material and build quality. Solid-based lamps with fabric shades diffuse light more softly than those with plastic or paper shades – the material affects not just aesthetics but how the light scatters. Table lamps in the $40-100 range are genuinely good for most spaces; you don’t need to spend more unless you want a specific design statement.
A dimmer switch – and I cannot overstate how much this changes a room – runs about $15-40 for the switch itself. If you’re renting and can’t swap out a switch, a plug-in dimmer cord (available for well under $30) works with most floor and table lamps and gives you the same control without touching the wiring. This is rental-friendly and worth doing immediately.
Plug-in sconces deserve their own mention here. They’ve gotten genuinely good in the last few years – they look almost identical to hardwired sconces, cost $50-150 for a decent pair, and install with a single nail or even a Command strip. For a small living room or bedroom, a pair of plug-in sconces flanking a sofa or bed does more for the space than almost any other single change you can make. This is one area where I’d actually suggest splurging a little – cheap sconces tend to have visible cords that are hard to manage, and the cord management is 80% of the aesthetic.
One thing nobody tells you: LED bulb quality varies dramatically even within the same Kelvin rating. A bulb labeled 2700K from one brand can look noticeably different from another. Look for bulbs with a high CRI rating (Color Rendering Index) – 90+ means colors in the room will look more natural and accurate. Lower CRI bulbs can make skin tones look slightly gray and fabrics look dull, which is the opposite of what you want in a space you’re trying to make feel warm and inviting.
Honest Truths About Small Space Lighting I Learned the Hard Way
More light does not mean better light. I spent a long time thinking a brighter room was a more welcoming room. It’s not. A small space flooded in 100-watt-equivalent daylight bulbs looks like a storage unit. Dimmer, layered, warmer light makes the same room feel like somewhere you’d actually want to spend time. The wattage on the box is almost irrelevant. It’s the Kelvin, the direction, and the layers that matter.
The first lamp you add will not feel like enough. This one got me. I’d add a floor lamp, the room would feel marginally better, and I’d wonder if I was doing it wrong. You’re not doing it wrong. The change becomes dramatic when you hit that third source – something at low level, something mid-height, something pushing light upward. Until all three are present, it just feels like “slightly better overhead.” After all three? Completely different room. Stick with it past the first lamp.
Natural light works against you if you’re ignoring it. I had a small apartment with one north-facing window, and I spent way too long fighting the darkness rather than working with it. The honest answer is: in a genuinely low-natural-light space, lean into the warmth. Dark walls actually make a poorly-lit small room feel cozier rather than smaller, when the artificial lighting is done right. I resisted this advice for years because it felt counterintuitive. My darkest-painted room ended up being the coziest one I’ve ever had.
I spent real money on lighting in a rental I moved out of six months later, and I’d do it again. Portable lamps come with you. Plug-in sconces come with you. Dimmer cords come with you. Almost nothing lighting-related in a rental is wasted money because almost none of it is permanent. The one exception: don’t drill into walls for hardwired fixtures without explicit landlord permission. That part is genuinely not worth the deposit risk.
Budget-Friendly Small Space Lighting Checklist
- ☐ At least three distinct light sources in the room (not all overhead)
- ☐ All bulbs within the same Kelvin temperature range (2700-3000K for living/sleeping spaces)
- ☐ At least one light source pushing illumination upward or onto a wall
- ☐ Dark corners addressed with at least one lamp or uplighter
- ☐ Dimmer available on at least one circuit or lamp
- ☐ No single overhead fixture doing all the work after 6pm
- ☐ Cord management handled – no visible trailing cords if possible
- ☐ High CRI bulbs (90+) used in at least the main ambient sources
Making Small Space Lighting Work in Your Actual Home
If You’re Renting
You have more options than you think. Plug-in sconces, floor lamps, table lamps, LED strip lights behind furniture, under-cabinet plug-in puck lights – none of these require drilling or permanent modification. Budget for three good portable light sources first ($150-300 total is realistic for decent quality), and add a plug-in dimmer cord to at least one of them. That’s a complete small space lighting setup that packs into boxes when you move.
The one thing to prioritize first: a floor lamp with a shade that diffuses light upward. It does more for a small rented space than anything else in this price range.
If You’re Working With a Very Tight Budget
Start with bulbs, not fixtures. Swapping every bulb in your space to warm-temperature, high-CRI LEDs costs under $30 total and immediately changes how the room feels. Then add one floor lamp – even a simple one in the $50-70 range makes a real difference if it’s placed in the right corner. Don’t try to do everything at once. One good light source placed well beats five mediocre ones placed randomly.
For Dining Room Lighting in a Small Space
A pendant or chandelier over a small dining table is genuinely worth the investment if you own your home – it creates what lighting designers call a focal point, drawing the eye upward and making the ceiling feel higher. If you’re renting, a plug-in pendant (the cord runs up to a ceiling hook – no hardwiring needed) achieves the same visual effect for $80-150. Hang it 28-34 inches above the tabletop, use a warm bulb, and add a dimmer. That’s a complete small dining lighting setup.
If You’re Starting From Scratch
Don’t buy everything at once. Live in the space for a week first and notice where you naturally want more light. That’s almost always where the darkest corner is – and that’s where your first lamp goes. Then build outward from there over time. Lighting decisions you make slowly tend to be better than ones you make in a single IKEA run.
If you’re feeling overwhelmed and want the one thing to do first: get a warm-toned floor lamp into your darkest corner tonight. That single change will tell you more about what your space needs next than anything else I could write here.
Your Small Space Lighting Questions, Answered Honestly
Q: Can I use LED strip lights to make a small space feel bigger?
A: Yes – with caveats. LED strips work beautifully when they’re hidden (behind a headboard, under a floating shelf, behind a TV console) and the light is what you see, not the strip itself. A visible LED strip stuck along a baseboard looks cheap regardless of color temperature. At $20-50 for a decent strip with warm-temperature LEDs, they’re one of the most budget-friendly small space lighting solutions available – but placement matters enormously. Behind furniture that’s pulled slightly from the wall is the easiest win.
Q: Does mirror placement actually make a room feel more lit?
A: It depends on what the mirror is reflecting. A large mirror reflecting a window or a lit lamp will genuinely amplify that light source and make a space feel brighter and deeper. A large mirror reflecting a blank wall or a dark corner does almost nothing. This is one of those small space lighting design tricks that really works – but only when the mirror is placed intentionally, not just hung wherever there’s wall space.
Q: Is there such a thing as too many lamps in a small space?
A: Technically yes, but in my experience, most beginners have the opposite problem. Where people go wrong with multiple lamps is having them all the same height (a row of table lamps at identical levels looks flat) or all the same intensity turned up equally bright. The goal is variety in height and the ability to control brightness independently – which is why dimmers and lamps with individual switches matter. Three lamps at different heights, all dimmable, gives you enormous flexibility without the room feeling cluttered.
Q: What about small space mood lighting – how do I actually achieve that soft, cozy evening atmosphere?
A: Turn off your overhead light entirely. That’s step one, and most people never do it because the overhead feels “safer.” With a floor lamp, a table lamp, and maybe a candle or two, the room will feel completely different – smaller in the best sense, more intimate, actually relaxing. Mood lighting is mostly just the absence of harsh overhead light, combined with warm-temperature bulbs at low or dimmed levels. You probably already have everything you need. You just need to flip the ceiling switch off.
The Real Shift Happens When You Stop Thinking About Fixtures
Here’s what I’ve come to believe after years of getting this wrong and then slowly getting it right: small space lighting isn’t really about the lamps or the bulbs or the fixtures. Those are just tools. It’s about learning to see a room the way light sees it – as a collection of planes and corners and heights, some illuminated, some in shadow, some connected and some floating.
Once you see it that way, every small space becomes something you can work with. The square footage stops being the sentence and starts being the canvas.
Most of my spaces are still works in progress – there’s a corner in my living room right now that I haven’t solved yet. I’ve tried two different lamps there and neither one was right. That’s just the reality. But I know why it’s not right, and I know what I’m looking for, and that’s the difference between someone who decorates hoping for the best and someone who actually understands what they’re doing. You’re building that now. That’s the whole thing.
If you try something from this guide – especially if it surprises you – I’d genuinely love to know what happened. Drop it in the comments, or save this for the next time you’re staring at a dark corner wondering what’s missing.