This article may contain affiliate links. If you purchase through a link, I may earn a small commission at no extra cost to you. Read my full Affiliate Disclosure.
I used to rearrange my bedroom furniture at midnight. Not because I wanted to – because I’d lie there at 10pm, staring at the ceiling, and feel this low-level hum of wrongness that I couldn’t explain. The room was fine. Clean enough. Furnished. Nothing obviously bad about it.
But it never felt like mine.
I finally started a proper budget bedroom makeover when I realized I’d spent three years adjusting small things – a new throw pillow here, a candle there – without ever addressing the actual problems. And the thing that stopped me from starting sooner? I thought it required serious money.
It doesn’t. I’ve since transformed multiple bedrooms – mine, a guest room, two rooms for friends – with under $100 each time. Not a Pinterest-worthy renovation. But a room that finally feels intentional, calm, and genuinely like the person who lives in it. This guide covers exactly how to do that, step by step, starting with the stuff nobody tells you.
Table of Contents :
Your Quick-Start Plan for a Budget Bedroom Makeover
Before you buy a single thing, here’s the full roadmap. Each phase matters – skip one and the whole thing feels patchy.
- Phase 1: Audit Before You Add – Walk around your room with fresh eyes and figure out what’s actually bothering you. Most people start spending before they’ve diagnosed the problem.
- Phase 2: Fix the Layout First – Move furniture before you buy anything. A well-arranged room with cheap decor beats a badly arranged room with expensive furniture every single time.
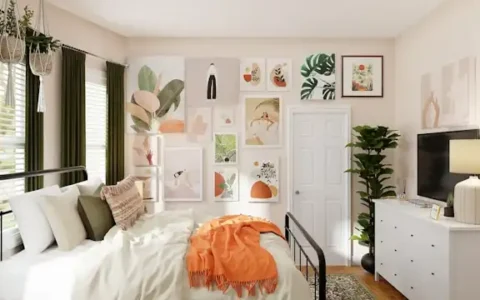
- Phase 3: Establish One Anchor Point – Identify the focal point of the room – usually the bed wall – and make that the priority. Everything else supports it.
- Phase 4: Sort the Lighting – Add at least one warm, non-overhead light source. This single change does more for a bedroom’s mood than almost anything else you can do for under $30.
- Phase 5: Layer in Texture and Warmth – A rug, a throw, one or two plants. These aren’t decorative extras. They’re what makes the room feel finished instead of staged.
- Phase 6: Edit Aggressively – Remove two things for every one thing you add. Clutter is the enemy of any budget makeover – it makes even beautiful rooms look cheap.
The Mistake Almost Everyone Makes With a Budget Bedroom Makeover
Here’s what I did wrong for years, and what I see people do constantly: they treat a budget bedroom makeover like a shopping project.
They open Pinterest, save 40 images, make a list of things to buy, and then wonder why the room still feels off after spending $80 at a home goods store. The throw pillows are nice. The little ceramic vase is cute. But the room looks exactly the same, just with more stuff on the surfaces.
The problem is that they’re adding before they’ve fixed.
What designers call visual hierarchy – the idea that every room needs one thing that draws your eye first, and everything else arranged to support it – this gets completely ignored when you’re in “add pretty things” mode. A bedroom without a clear focal point just reads as random, no matter how individually nice the pieces are. And the focal point is almost always free to establish. It’s a furniture arrangement decision, not a purchasing decision.
I did this wrong in my first four apartments. Added things. Moved things. Added more things. Then a designer friend came over, moved my bed to a different wall, told me to remove half the stuff on my dresser, and the room looked completely transformed. Cost: zero dollars. I’m still a little embarrassed it took that for me to understand what was actually going on.
How to Do a Budget Bedroom Makeover: What Actually Works
Start With the Bed Wall – Everything Flows From Here
The bed is the visual anchor of any bedroom. That’s not a style preference – it’s just physics. It’s the largest piece of furniture in the room, and wherever it lives, your eye goes there first. So before you touch anything else, get the bed placement right.
In most bedrooms, this means the bed goes on the wall opposite the door, or on the wall the door faces when you walk in. You want to see it as you enter – not tucked into a corner, not shoved against the side wall unless the room’s dimensions genuinely force it. The moment you get this right, the room starts to make sense almost automatically.
Then – and this is the part most guides skip – you create a focal point on that wall. Not by buying a headboard necessarily (though that helps), but by making the wall behind the bed feel intentional. This can be as simple as hanging two identically sized frames at the same height on either side of center, or doing a section of removable wallpaper in a muted pattern. Renters: peel-and-stick wallpaper panels have gotten genuinely good. You can do an accent panel behind your bed for under $40 and peel it off when you leave.
One practical check: measure the width of your bed and make sure whatever’s on the wall behind it is slightly wider than the mattress. A tiny frame floating above a queen bed looks lost. The scale needs to match.
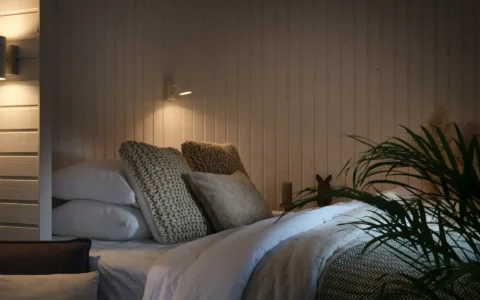
The Lighting Thing Nobody Talks About Enough
I got this completely wrong for years. Overhead lighting – that central ceiling fixture everyone has – is the worst possible light for a bedroom. It’s harsh, flat, and it makes everything look like a waiting room.
Professional lighting designers call this layered lighting – the idea that every room needs multiple light sources at different heights to feel warm and dimensional. In a bedroom, that means your overhead light is basically just for getting dressed. Your actual room lighting should come from two or three lower sources: bedside lamps, a floor lamp in a corner, maybe a small table lamp on a dresser.
The magic number for bedrooms is 2700-3000K on the color temperature scale. That’s the warm amber-white light that makes a room feel cozy rather than clinical. A lot of budget LED bulbs default to 4000K or higher, which is that cool, slightly blue-white light that feels great in a kitchen and slightly depressing in a bedroom. Check the bulb packaging before you buy – it matters more than the lamp itself.
A plug-in sconce (no electrician, no drilling if you use Command strips for the cord) or a secondhand floor lamp with a warm bulb will do more for your bedroom’s mood than almost any decorative purchase you can make for the same money. I’ve picked up floor lamps at thrift stores for under $15 and they transformed rooms. The lamp doesn’t need to be beautiful – it needs to be warm and low.
I remember the first time I actually got the lighting right in a bedroom – really right, two warm lamps and no overhead at all. I turned the overhead off and stood in the doorway at dusk and the room looked like somewhere I’d actually want to stay. It sounds small but it wasn’t. It was the thing that finally made me understand why some rooms feel like hotels and others feel like home.
Rugs, Throws, and the Question of Texture
Here’s the honest truth about what makes a budget bedroom look finished: texture. Not more furniture, not more art, not a specific color palette. Texture is what separates a room that looks like a catalog and a room that feels like someone lives there.
A rug under the bed is one of the highest-ROI moves in any bedroom. Not just aesthetically – though it does anchor the whole space – but in terms of how the room feels underfoot when you get up in the morning. For a bedroom rug on a tight budget, I’d skip the natural fiber options. Jute and sisal are beautiful but they shed noticeably, they’re uncomfortable to walk on barefoot, and they’re nearly impossible to deep clean. Synthetic rugs in a simple pattern (solid, subtle stripe, low-key geometric) clean easily and look fine. Quality varies widely in synthetics, so wherever you buy, touch it first if you can – the denser and heavier it feels, the better.
Sizing is where most people make the mistake. For a queen or king bed, you want a rug large enough that the front two legs of the bedside tables are on the rug and you have at least 18 inches extending beyond the sides of the bed. A too-small rug is the single thing that most reliably makes a room look like an afterthought. If you can only afford a small rug, place it completely under the bed and let just a sliver show on each side rather than floating a small rug in the middle of the room.
A throw blanket folded at the foot of the bed or draped over a chair does something similar – it adds softness and a layer of visual interest without requiring any design skill. Worn linen and chunky cotton throws both read well in a minimal modern bedroom. Avoid anything too shiny or too synthetic-looking in texture – it tends to cheapen the whole effect.
The Furniture Quality Question (And What to Actually Spend On)
On a $100 budget, you’re not buying new furniture. But you might be working with pieces you already have, buying secondhand, or making small targeted purchases – and knowing what to look for matters.
The honest material reality of budget furniture: most of it is MDF or particle board, which is heavy, doesn’t hold screws well over time, and really doesn’t love moisture. That’s fine for a nightstand or dresser in a dry bedroom. Where it becomes a problem is with pieces that get used hard – drawers that open and close constantly, joints that take weight. The joinery method is actually a better predictor of longevity than the material: a piece with corner blocks or metal cam locks will hold up significantly longer than one held together with just dowels and glue. You can often tell by how heavy the piece feels relative to its size – heavier usually means denser board and better hardware.
For a budget bedroom makeover, I’d suggest spending on: a rug (if you don’t have one), lighting (bulbs at minimum), and one textile upgrade – a decent duvet cover or set of pillowcases can genuinely transform how the bed looks. These are the things that affect the room’s daily feel. I’d save on: art (frame something personal or free), throw pillows (thrift stores consistently have good ones), and decorative objects (edit what you already own before buying more).
There was a point where I spent about $200 on a bedroom and it still looked wrong for months. I’d bought a new duvet cover, new art, new pillow covers – and I’d never moved the furniture from where it was when I moved in. Everything I bought just disappeared into the visual chaos of a badly laid out room. I had to basically start over before anything clicked. Don’t do what I did.
Honest Truths About Budget Bedroom Makeovers I Learned the Hard Way
Your clutter is louder than your decor. This is the one I wish I’d taken seriously years earlier. You can have genuinely beautiful pieces in a room and it will look cheap and chaotic if there’s too much stuff. A $5 throw on a clean, cleared surface reads more expensive than a $50 throw surrounded by six other things. Before you spend a single dollar, remove. Fill a box. Put it in another room. Live with the edit for a week. I promise you the room will look better before you’ve bought anything.
The “before” photos on Pinterest are lying to you. The “before” in most makeover content shows a deliberately bad version of the room – sometimes staged to look worse than it was. The transformations are real, but the starting point is often manipulated. Your room’s “before” is probably not as bad as those. Which also means your “after” won’t require as dramatic an intervention as you think. Small, targeted changes to an already decent room can feel like a total transformation.
Paint is not always the magic fix. I know. Every makeover guide says paint is the easiest, cheapest, most impactful change. And sometimes it is. But painting a room takes a full day at minimum when you factor in prep and two coats, it costs $30-60 just for paint and supplies, and if you rent, it’s either not allowed or requires returning to the original color. Before you paint, try a removable wallpaper panel or a gallery wall on the bed wall first. You might get the same visual impact without the commitment.
I have genuinely cried over a room before. Not my proudest moment. I’d been working on a space for weeks, spending money I didn’t have a lot of, and it just… didn’t look right. I sat in the middle of it and felt completely defeated. If you’ve been there – you’re not being dramatic. That feeling is real. But it almost always comes from trying to fix the wrong things. When I finally stepped back and asked “what is the actual problem here,” the answer was almost always the layout. Move the furniture first. Always move the furniture first.
Budget Bedroom Makeover Checklist
- [ ] Bed placed on the most intentional wall, visible from the doorway
- [ ] Clear focal point established on the bed wall
- [ ] At least two warm light sources (2700-3000K) beyond the overhead fixture
- [ ] Rug properly sized – front legs of nightstands on the rug, or rug wider than the bed
- [ ] Surfaces edited down – nothing on a surface that doesn’t belong there intentionally
- [ ] At least one textile layer (throw, textured pillow, linen duvet) adding softness
- [ ] Clear 2-3 foot traffic path from door to bed and around the bed
- [ ] Color feels intentional – three or fewer tones dominating the room
Making This Work in Your Actual Space (Not a Pinterest Fantasy)
If You’re in a Small Room or Studio
The biggest mistake in small bedrooms is filling every corner in an attempt to make the space feel “finished.” It backfires. What actually makes a small room feel larger is negative space – the empty areas that give your eye somewhere to rest. Keep at least one wall as close to clear as possible. A floating shelf with two or three objects beats a dresser covered in stuff every time.
Prioritize first: lighting. A warm lamp in a small room makes it feel cozy rather than cramped. Wait on: accent furniture. A reading chair sounds lovely in a small bedroom and usually just blocks the traffic flow and makes the room feel cluttered. Budget reality: $100 goes a long way in a small space because you need fewer things to make it feel right.
If You’re Renting
Almost everything in this guide can be done damage-free. Removable wallpaper for the bed wall accent. Command strips for lightweight frames. A plug-in floor lamp instead of wall sconces. A freestanding clothing rack instead of adding hooks. The one thing renters sometimes can’t do is paint – but honestly, a removable wallpaper panel and a well-lit room will do more for your space than a fresh coat of white paint anyway.
Prioritize first: the rug and lighting – both completely renter-friendly and both high impact. Budget reality: $60-80 can cover a decent synthetic rug and a secondhand lamp with a new warm bulb.
If You’re Starting With What You Already Own
Good news: you probably have more to work with than you think. Before spending anything, do a full edit. Remove everything from every surface. Remove everything you don’t love or use from the room entirely. Then put back only what genuinely belongs there. Then rearrange the furniture using the bed placement principles above.
Most people find that after this process, they need very little. Maybe one warm lamp. Maybe a rug if they don’t have one. Everything else was there already – it just needed organizing.
If you’re feeling overwhelmed right now and you only do one thing: move your bed to the most intentional wall in the room and clear your two biggest surfaces completely. That’s it. Do that first. Everything else can wait.
Questions I Get Asked About Budget Bedroom Makeovers All the Time
Q: Can I really make a noticeable difference for under $100?
A: Yes – but only if you’re strategic about what you spend it on. The biggest impact moves (layout, lighting, editing clutter) cost nothing. The $100 is best spent on one or two things that are genuinely hard to DIY: a rug, a warm lamp, or a decent duvet cover. Don’t spread $100 across ten small things. Spend it on one or two higher-impact items.
Q: What’s the single most impactful change I can make?
A: Honestly? It depends on your room’s specific problem. If the layout is wrong – that’s the fix, and it costs nothing. If the lighting is harsh overhead fluorescent – that’s the fix, and a $20 lamp changes everything. If the room feels bare and echoey – a rug. There’s no universal answer, which is why the audit step matters so much. Diagnose before you spend.
Q: Is it worth painting a bedroom on a tight budget?
A: Conditionally. If you own your home and the walls are a color that actively works against the room (very saturated, very dark, very dingy), then yes – a fresh neutral coat is worth it. If you rent, or if the walls are already white or a soft neutral, I’d skip it and spend the $50 on lighting instead. Paint is often recommended as the “cheap, easy fix” but it’s actually pretty involved when done properly, and it eats up budget that might be better used elsewhere.
Q: My room has terrible overhead lighting and I can’t change the fixture. What do I do?
A: Never turn it on. I’m only half joking. Get one or two floor lamps and bedside lamps with warm bulbs (2700K), use those as your primary light sources, and treat the overhead as an emergency utility light only. You’d be amazed how much a room changes when you stop using the overhead entirely. This costs $20-40 for a thrifted lamp plus a good bulb, and the difference is dramatic.
The Room You Actually Want to Come Home To
Here’s the thing about a budget bedroom makeover that nobody puts in the pin description: the budget part isn’t really the hard part. The hard part is slowing down enough to figure out what the room actually needs – not what’s trending, not what looked good on someone else’s feed, but what would make you feel at home in that specific space.
That takes some trial and error. It took me years of moving furniture at midnight and buying things that didn’t work and starting over to understand that most of it comes back to a handful of fundamentals: light that’s warm and layered, a layout with a clear focal point, surfaces that breathe, textures that soften. None of that is expensive. All of it is learnable.
The more I do this, the more I’ve come to believe that a room that feels like you isn’t a matter of budget – it’s a matter of attention. You’re paying attention to your space. You’re asking what it actually needs instead of just adding to it. That’s the whole skill. And you’re already doing it.
Drop a comment and tell me which phase you’re starting with – or what the specific thing is that’s been bothering you about your bedroom. I read every one, and sometimes the best fix is just someone else looking at your problem from the outside.